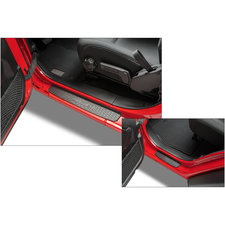
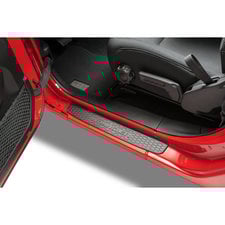
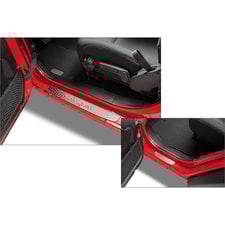
Hey Rob here with Quadratec.com. Today we're gonna be showing you how to install the Mopar Door Sill Guards in our 2018 Jeep Wrangler JL. Of course we have a four-door here but the installation procedures for the front doors are identical to the two-door version of the Wrangler, so of course if you got a two-door you can just follow along with our installation steps here for the front and we're gonna be installing the black plastic version of the door sill guards. Of course Mopar has a stainless steel version as well and the installation procedures are pretty similar for the two and we'll talk about the differences when we get to them. The first thing we need to go ahead and do is grab a microfiber rag and just make sure that our door sill is nice and clean here and then we'll want to use one of the provided alcohol prep pads. We can go ahead and open that up and we just want to give that door sill a nice wipe with the alcohol pad just to make sure there's no residue or dirt that could prohibit a good adhesion from our sill guards. All right now while waiting for that alcohol to go ahead and evaporate and dry off here if you've got the black plastic version of the guards like I mentioned they are going to install with double-sided tape, same as the stainless steel version. Now with the stainless steel version you're gonna want to refer to the installation instructions that came with the guards so that you can locate them in the proper position on your door sill. There's some measurements that you can take off the edge of this piece of sheet metal here that it will locate them in the proper position. With the black plastic guards, well if you flip them over on the back you'll notice they're actually labeled sill plate front left, front right, rear left, rear right and that's because if you look down the edge of the guard you'll notice a little indicator here, a little arrow and what you want to do is line that arrow up with the edge of that piece of sheet metal and that will locate the sill guard in the proper position in the door sill for you. Now we'll go ahead and grab the backing tape that's attached to our double sided tape pull the backside one out further, then one that's towards the front side out slightly, and then we can go ahead position so guard into place again like I mentioned getting that indicator lined up perfectly with the edge of that sheet metal. Give it a little push down on the edge here to seat it and grabbing the rear piece of tape backing first pull that one out and now grab the piece for the front go ahead just give it a little bit of pressure there that's all it takes to get your door sill guard installed in your front door. Now we'll go ahead and move on to the rear door and then we can move on to the other side of course. The first step before we install the guard in our rear door opening is to grab our towel again make sure there's no dirt grime or grease in our door sill here. Grab another one of the included alcohol prep pads and give that door jamb a good thorough wipe down all along here where the door sill guard will be adhered. Now while we're waiting for that alcohol to go ahead and evaporate off just like with the front guards we want to make sure we go ahead and grab the correct sill plate rear left here for our rear left door and that is because just like with the front guard we've got another little indicator here that is going to help us align our door sill guard perfectly in the opening here with the edge of that sheet metal. Again, if you're installing the stainless steel guards refer to the installation instructions they give you a measurement that you can take off of this body line here that will locate the stainless steel guards in the perfect position. We'll go ahead and start by peeling back the edge of our strip of double-sided tape in the back and then the front. Start that one as well of course leaving that one behind the rear. Now we can go ahead and get the arrow lined up perfectly there with our edge sheet metal and making sure that you're holding the guard back firmly against the door jamb there and go ahead just apply a little bit of pressure here to hold it in place you can check to make sure you're perfectly lined up. Now pull the rear piece of double-sided tape first followed by the front applying pressure to get a nice good adhesion from that double-sided tape and that's all it takes to install the Mopar door sill guards in your 2018 Jeep Wrangler JL. Of course we've got the passenger side left to finish up but if you guys want to purchase a set of door sill guards for your Wrangler you can click that info button to head over to Quadratec.com. If you've got any questions about how to install your door sill guards, well you can leave them for us in the comments section below or hit us up at any of the options on the screen in front of you. You want to make sure you hit that subscribe button so you're sure to catch all of our latest Jeep Wrangler JL product reviews and installation videos. Until next time, I'm Rob, I'll see you guys out on the trail!
The Mopar Door Sill Guards are available in Black Plastic and Stainless Steel for both the 2 and 4 door Jeep Wrangler JL. They install simply using double sided tape and the full install takes just minutes to complete.
Shop Products in this video
3 results

Comments