by Scott Ammerman
Quadratec Channel Correspondent
When you are a Jeep owner, it is certainly easy to get so focused into one project that you forget how it may affect other items on your vehicle.
For me, I recently upgraded my 2008 Jeep Wrangler JK Rubicon with a 2.5” Rock Krawler mid-arm suspension, and installed new Mickey Thompson 35” wheels and tires, but I didn’t give much thought to the spare tire until it was time to heft its full weight onto the back of my Jeep.
As it turns out, the spare's added weight could easily bend the factory hinges and tailgate as it bounced down the trail. I had a few options for the short term; I could mount the factory-sized spare on the back, hoping I wouldn’t get a flat in the near future, or I could throw the new wheel and tire in the trunk, severely limiting my ability to carry much more than my lunch in the cargo area. Neither option was ideal, and a mismatched spare has always looked disappointing in the rear view mirror as I passed another Jeep, so it was time for another quick upgrade to set things right.
If you don't already know, the factory tailgate hinge setup was simply not designed to hold the weight of an oversized off road wheel and tire. With the dainty factory-sized configuration, the steel hinges and 10 mounting points are ample - but the added downward force of the weight, plus the additional leverage added by increased backspacing of aftermarket wheels will cause the sheet metal to twist in ways never intended by engineers. As with many things, the exact weight limit of the factory JK tailgate setup is a subject of heated debate on the Internet. When you consider the cost of a replacement tailgate, hinges, paint and labor though, a stronger mounting solution is cheap insurance.
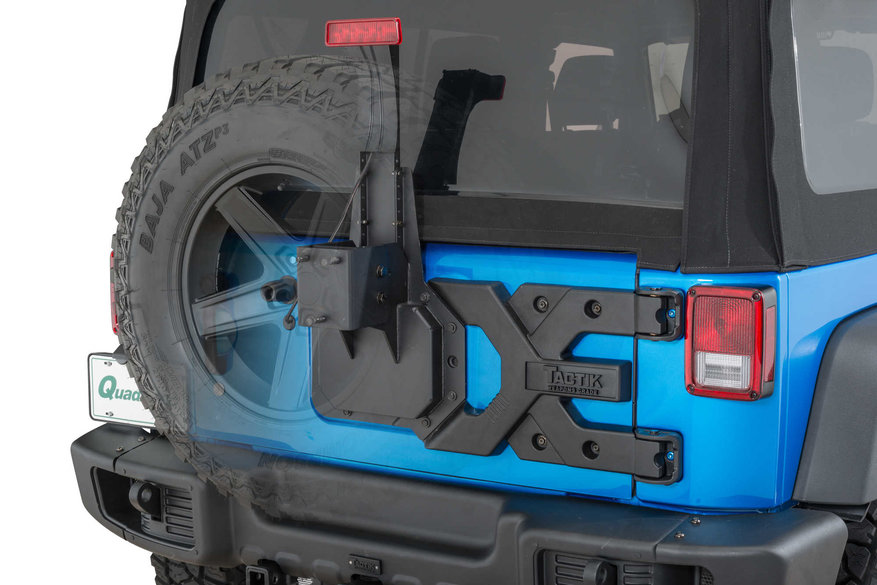
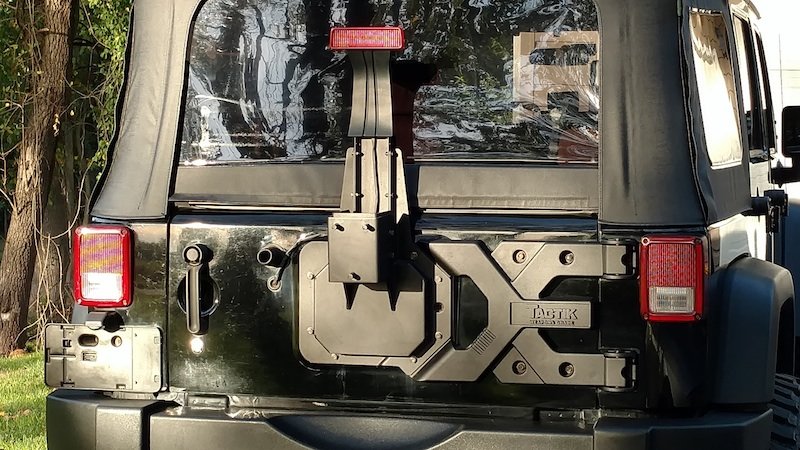
The Tactik Hinge Reinforcement kit is made of heavy cast aluminum, and has burly case-hardened pins inside the hinges. It boxes in the factory mounting points (instead of being two separate hinge assemblies) and extends all the way over to tie in with the factory spare tire mount bolts. It can be used with the factory tire carrier, but with my setup the larger diameter tire would have completely blocked the third brake light.
The Tactik Adjustable Spare Mount allows for the added height of the larger tire, and is also adjustable to accommodate wider tires and different offsets. Both of these items are available separately, or in a single box solution that saves you money. If you do not already have an aftermarket bumper with the option to add a tire carrier, this is a cost-effective solution.
Installation is a snap, whether you are a garage nut or not, and can be performed entirely using hand tools. I used a ⅜-inch impact wrench for some of the steps (set to low) to speed things along for the video, but it definitely wasn’t necessary. I like lifting heavy objects and putting them back down again, so I didn’t have a friend help me lift the spare into place - you have to do this at least twice to check the adjustment and mount the spare, so if you’re not feeling like an animal that day, having a friend on call is advisable. As always, remember to lift with your legs. I also misplaced my safety glasses, please don’t tell OSHA.
What you will need for the Hinge Reinforcement installation:
- Safety Glasses
- 10-12” long ⅜” Extension (to reach past the hinges)
- 13mm socket
- ¾” deep socket for wheel removal
- T-20 (for third brake light disassembly) & T-47 (for body side hinge bolts) Torx bits
- Red thread locking compound (for permanent installation) or Blue if you might change your mind
- Wooden or plastic shims to support tailgate during installation
- Torque wrench for final wheel installation
Additional tools for the Adjustable Tire Mount installation:
- 10mm socket
- 10mm wrench
- 19mm socket
- 19mm wrench
- 6mm Allen wrench, socket or bit
- #2 Phillips Head screwdriver
Optional:
- Tape measure, for getting a rough idea of spare tire height and backspacing
- Cleaning supplies for the parts you’re reusing, you may be surprised how dirty they are
- A light hammer for gently tapping T-47 Torx bit into place if the bolts have never been removed, or if they are painted
Pro Tip: For larger tire sizes, a wiring harness extension for the third brake light is included. I didn’t need to do this for 35” tires. If your wiring isn’t long enough, you will need wire cutters and a crimping tool to extend them. I originally set my third brake light up too high, and adjusted it later. I believe with my tailgate wiring I would have had enough room for 37” tires (and possibly a little larger) without having to extend the harness. Not all harnesses are the same length, however. Your application may vary.
The product instructions for these Tactik series items are well written, and include detailed pictures. I used a collection of little wooden shims in stacks to brace the tailgate against the bumper, and kept it locked. You want a tight fit there, so having an assortment of various width shims on hand is good preparation. At one point, you loosely install the six T-47 Torx bolts, then you flip the hinge closed, and loosely thread in the factory spare tire carrier bolts. Then you tighten the outer T-47s, and remove the factory bolts again before tightening the inner ones. This sets the angle of the whole bracket, and is a critical step. I got a little lost and forgot to tighten the four T-47s again before assembling the tire carrier so, lucky me, I had to take everything apart again to correct my mistake. Pay careful attention to these steps, unless you enjoy repeating them and swearing at yourself. It's actually incredibly distracting having to mess with a camera and tools, it turns out.
A little beyond that step, you switch over to the other set of directions to assemble the tire carrier. I used a tape measure to get an idea of how far out to mount the carrier bracket (nailed it!), but was off in my overall measurement of the third brake light. Luckily, this is easy to adjust with the whole thing assembled. It's better to make a mistake on the high side, as you can mount the spare and adjust as needed with the tailgate open.
Once the Tactik carrier is assembled and installed, one of the final steps includes using thread locking compound on the 13mm factory bolts that hold the hinge to the tailgate. Red thread locker is for permanent installation, and usually requires the use of heat to break the bond. If you think you might be removing this later, you should probably use blue like I did. If you decide on blue, then you should check the tightness of the bolts in a few weeks (and periodically) to make sure they haven’t moved.
Tighten the supplied lug nuts (or whatever locks or lugs you’re going to use) to 80 ft-lbs of torque after everything is assembled. Your larger spare tire was probably not cheap, and is definitely heavy. Unintended separation from your Jeep while in motion would be a very, very bad thing.
Total installation time for me was around two hours; working by myself and making a mistake or two. The tailgate required no adjustment once I was finished, and it shuts tight with no rattles. If you need to adjust your tailgate striker, all you’ll need is a T-40 Torx.


